
10 Questions On Canadian Snow And Wind Loads
Before ordering steel buildings made in Canada, I’d confirm the site’s snow and wind requirements with a licensed engineer and local building department. Loads are measured in kilopascals (kPa), but a ground snow value is not the load your roof must support.
I’ve grouped the checks into 10 questions covering:
- How site data sets design loads.
- How location, elevation and terrain affect them.
- How roof snow loads are calculated.
- How roof shape and slope change loading.
- Where drifting and sliding snow need checks.
- How wind affects frames, cladding, doors and anchors.
- How snow and wind loads are combined.
- Whether insulation and heating change requirements.
- Which sealed drawings and kit documents and steel building prices to request.
- Which local checks and permits apply.
My starting rule: <u>confirm the site, code edition and foundation design responsibility before buying</u>. A generic load rating alone does not show that a building meets your site’s requirements.
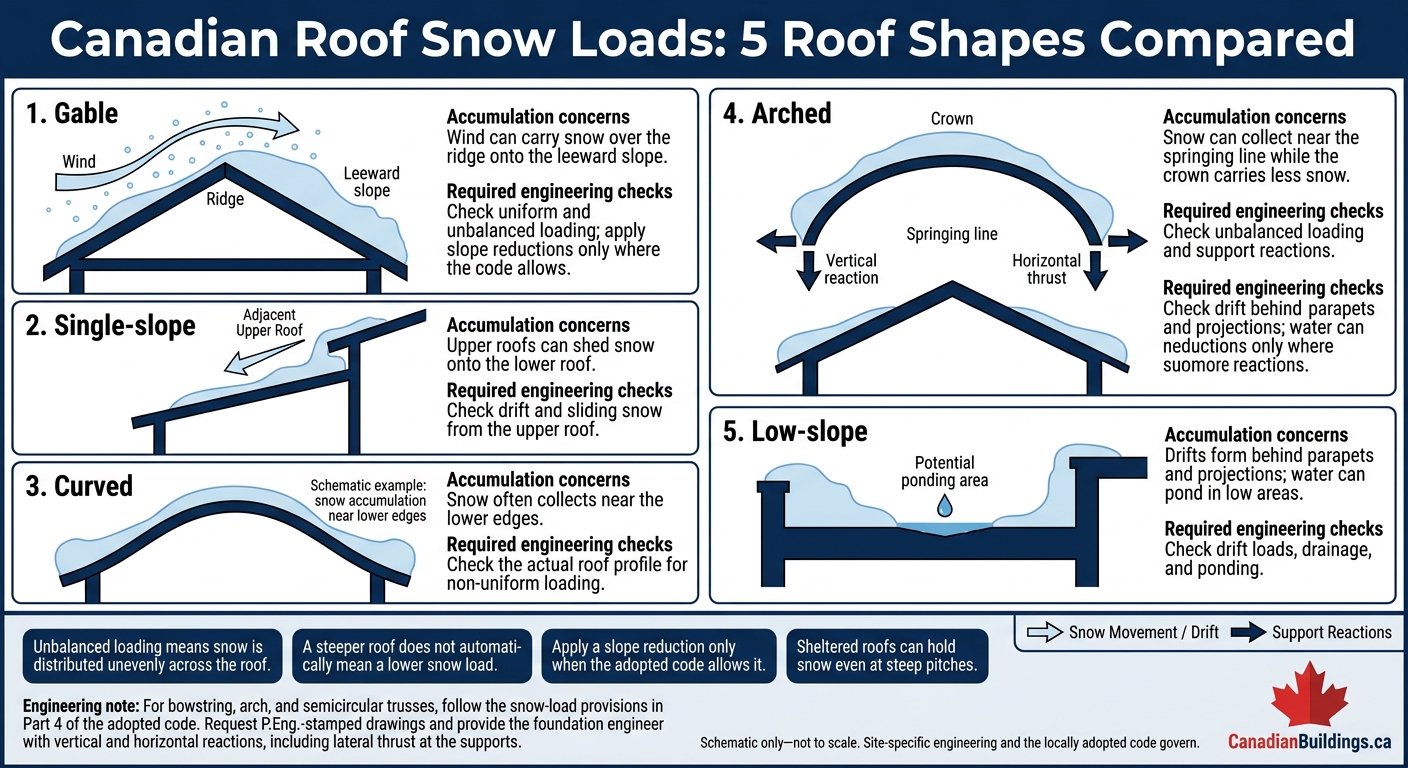
Canadian Roof Snow Loads: 5 Roof Shapes Compared
NBCC 2020 Snow Load Calculation Explained | Industrial Building Design Example |#construction #2026
sbb-itb-747b4cf
1. How are snow and wind design loads determined?
Engineers start with site data: ground snow load (S_s), associated rain load (S_r), and design wind pressure based on exposure. Ground snow load is the code value for open ground and the starting point for roof design. These values come from historical climate patterns recorded by Environment and Climate Change Canada.
Engineers then calculate roof snow and wind loads, accounting for roof slope, snow drifting and sliding, and exposure. These loads determine member sizes, connections, and foundation design.
The calculations must follow the code that applies to the project. The National Building Code of Canada (NBCC) is a model code; the adopted provincial or territorial code, along with any local amendments, governs the design.
Confirm the code edition and site load values with the authority having jurisdiction (AHJ), usually the municipal building department. Give your engineer the exact site address before design and permit submission so they use the correct climatic values – these can differ from one community to the next.
2. How does location affect snow and wind loads?
Base climatic values are the starting point. Elevation, terrain and shielding can change both snow and wind loads. In mountainous parts of British Columbia and Alberta, snow loads can vary sharply with elevation. Data from a nearby valley city may not suit a building site higher up. Prairie and northern sites also need careful drifting checks: less snowfall doesn’t always mean a lower roof load.
Coastal sites often have more thaw cycles, while central regions can face heavier uniform snow and drift loads. Broad load-zone maps don’t account for surrounding structures or local exposure, so they can’t replace site-specific design inputs.
Use these site factors as starting inputs for design.
| Item | What needs checking | Verification source |
|---|---|---|
| Ground snow load, S_s | Climatic value in kPa for the location, accounting for elevation | NBC climatic data tables; site-specific engineering analysis |
| Roof snow load, S | Calculated roof pressure in kPa, including exposure, slope and accumulation factors | Site-specific structural calculations under the applicable code |
| Associated rain load, S_r | Climatic rain contribution in kPa, included in the roof snow calculation | NBC climatic data tables |
| Wind exposure | Terrain and shielding assumptions, not just a regional pressure value | Site-specific engineering analysis |
Climatic inputs and calculated roof loads are not interchangeable. Before using a value, check whether it represents ground snow or roof snow.
Before engineering starts, provide the site elevation, terrain details, and the heights and positions of nearby buildings. Higher roofs, parapets and rooftop projections can create sheltered drift zones. Lower buildings beside taller ones need extra attention, too.
3. How are roof snow loads calculated?
Once the site snow values are set, the next step is to calculate the load the roof must support. This accounts for snow depth and density, plus how wind and roof shape redistribute snow. Use the code edition tied to the permit, starting with this formula:
S = I_s [S_s (C_b × C_e × C_s × C_a) + S_r]
Here, S is the roof snow load. S_s is the ground snow load, and S_r is the associated rain load introduced above. All three are measured in kPa.
The other factors adjust the calculation: I_s reflects building importance; C_b is the basic roof snow load factor; C_e accounts for exposure; C_s accounts for roof slope; and C_a accounts for accumulation and roof shape. Your engineer must choose the applicable factors and check drift and accumulation cases.
Ask for the full calculation, not just the final number. Planned snow removal does not reduce the design load unless the code allows it. Confirm that the calculated roof snow load matches the load used in the engineered design.
4. How do roof shape and slope affect snow loads?
Once the base roof load is set, the roof’s shape determines where snow collects and where engineers must check for uneven loading.
Unbalanced loading means snow is distributed unevenly across the roof. Wind can strip snow from one slope and pile it onto the other, so both uniform and unbalanced loading must be checked.
| Roof type | Accumulation concerns | Required engineering checks |
|---|---|---|
| Gable | Wind can carry snow over the ridge onto the leeward slope. | Check uniform and unbalanced loading; apply slope reductions only where the code allows. |
| Single-slope | Upper roofs can shed snow onto the lower roof. | Check drift and sliding snow from the upper roof. |
| Curved | Snow often collects near the lower edges. | Check the actual roof profile for non-uniform loading. |
| Arched | Snow can collect near the springing line while the crown carries less snow. | Check unbalanced loading and support reactions. |
| Low-slope | Drifts form behind parapets and projections; water can pond in low areas. | Check drift loads, drainage, and ponding. |
The checks depend on the roof’s shape and nearby structures. A steeper roof does not automatically mean a lower snow load. Apply a slope reduction only when the adopted code allows it. Sheltered roofs can hold snow even at steep pitches.
For bowstring, arch, and semicircular trusses, follow the snow-load provisions in Part 4 of the adopted code. Standard kit assumptions do not cover these shapes. Arch-type roofs also produce support reactions that the structural design must account for. Request P.Eng.-stamped drawings, and confirm that the foundation engineer receives both vertical and horizontal reactions, including lateral thrust at the supports.
5. When must drifting and sliding snow be checked?
Once the roof shape is set, check for drift loads where wind piles snow into sheltered areas: parapets, valleys, roof steps and projections such as mechanical units. Assess nearby higher structures too, since they can change where snow collects on your roof.
Sliding snow needs a separate load check. It moves load from one surface to another, so the design must account for snow sliding from an upper roof onto a lower roof – not just direct snowfall.
A uniform roof load can miss heavier loads concentrated over a few purlins, rafters or connections. Request drift-zone limits, applied loads and the effects of any snow guards. These loads may determine member and connection sizes even when the rest of the roof has enough capacity. Snow guards change how snow stays on or slides off the roof, so structural design must account for them.
Before submitting for a permit, provide the roof geometry, nearby building heights and locations, and snow-guard locations. Compliance depends on that geometry, not just a single roof load value. Include drift calculations in the permit package and send the resulting column reactions to the foundation designer. These local loads affect both roof framing and support reactions.
6. How are wind loads applied to steel buildings?
Snow governs vertical load; wind governs lateral force and uplift. Engineers calculate wind pressures using the site’s climate, terrain exposure and roof geometry. Openings also affect pressure inside the building.
Large doors matter here. When wind enters a large opening on the windward side, it increases outward pressure on walls and uplift on the roof. Depending on their openings, buildings may be classified as enclosed or partially enclosed, which changes the design pressures. Provide door sizes and locations before the frame and bracing layout is fixed.
Engineers must check every component along a continuous wind load path, from the cladding to the foundations.
| Component | Pressure and load-path checks |
|---|---|
| Main frames | Check lateral forces, uplift and stability, and transfer reactions to the supports. |
| Cladding | Check panels and fasteners for pressure, suction and edge and corner uplift. |
| Doors and windows | Check assembly strength and internal pressure effects. |
| Bracing | Confirm a continuous wind load path through roof and wall bracing to the foundations. |
| Anchors | Check uplift, shear, bolt layout and embedment. |
| Foundations | Check uplift, sliding, overturning and soil bearing against the supplied reactions. |
These checks work together. Strong panels cannot make up for weak fasteners or inadequate anchors. Ask for roof-edge and corner fastening details, and confirm that the foundation designer has received the wind reactions.
A wind-speed rating alone does not prove compliance. It does not explain how site exposure, roof shape and openings translate into design pressures. Request site-specific wind calculations and sealed drawings that follow the locally applicable code, prepared by a professional engineer licensed in the province where the building will be built.
7. How are snow and wind loads combined?
Once site-specific snow and wind loads have been calculated separately, they must be checked together under the governing code. Use the locally adopted code load combinations – not the maximum snow and maximum wind loads added together.
The governing load combination is the factored case that places the highest demand on a member or connection. Different parts of the structure may be governed by different cases:
A rafter may be gravity-controlled, while an anchor may be uplift-controlled.
Request calculations that show the governing combinations and column-base reactions for footing design. These reactions are used in the foundation design and permit drawings.
8. Do insulation and heating change snow-load requirements?
Not automatically. Thermal conditions affect how a roof behaves, but they don’t change code snow loads or governing load checks unless the locally adopted code permits it.
Heat escaping through a roof can melt snow at the roof surface. On metal roofs, that meltwater can trigger sliding. Better insulation reduces heat loss.
Moisture control matters, too. Air sealing and vapour retarders limit condensation caused by warm, moist air in cold roof assemblies. For roofs with attics, suitable insulation and ventilation help limit uneven melting. Keep drains and gutters clear so meltwater can escape.
Before finalizing the roof assembly, share the planned assembly and heating conditions with your licensed structural engineer. If a load reduction is proposed, require verification, the supporting code provision and the assumptions in the calculations – not just a “heated” label.
Review energy compliance separately from structural design. Insulation, air sealing and provincial energy rules do not establish snow-load capacity.
9. What engineering documents should a steel building kit include?
Once the loads are calculated, the permit package must show that the design meets them. Request a site-specific engineering package stamped by a professional engineer licensed in the province. It should identify the location, occupancy, applicable code and provincial amendments. It must also define the building geometry: span width, eave height, bay spacing, roof pitch and openings.
The design criteria should document ground snow values, roof-load assumptions, drift cases and wind pressures. For steel building systems, verify CSA A660 certification and request the project-specific Certificate of Design and Manufacturing Conformance, signed and sealed by a licensed professional engineer.
Drawings should include member and connection schedules, bracing plans, roof and wall cladding specifications, and fastener requirements. Keep the final stamped set and all approved revisions together. These documents must match the snow and wind calculations submitted for the permit.
Settle foundation responsibility before ordering. Require anchor bolt plans and column base reactions, and specify who will design the foundation using those reactions and the site soil data. The authority having jurisdiction (AHJ) reviews these documents before approving the permit.
10. What local checks and permit approvals are required?
Once the engineering design is set, the final step is local approval. Contact the local building department before ordering to confirm the adopted code edition, the site-specific snow and wind values used in the design and, in Ontario, the applicable SB-1 edition.
Check zoning, intended occupancy, setbacks and required sealed drawings. Also confirm whether a geotechnical report is needed to verify soil bearing capacity and frost depth. Local approval depends on verified site data and sealed engineering documents – not a generic load rating.
Submit the full permit package, including site plans and any required grading and drainage plans. Address reviewers’ comments, then obtain the building permit and any other required approvals before construction. This review confirms the site-specific loads and design details.
Have the engineer review later changes for their effects on loads before construction. Changes may require revised sealed drawings and permit approval.
Larger doors can alter wind pressures, lean-tos can change snow drifting, and solar equipment adds loads.